
Proper cleaning and routine maintenance after each day’s work are vital for extending the life of your FP700 and ensuring reliable performance. This lesson covers cleaning procedures for both spraying and spreading configurations.
Post-Spraying Cleaning:
- Empty Tank & Purge Lines:
- Safely discharge any remaining liquid pesticide from the tank and spray lines away from water sources, crops, or sensitive areas. Use the app’s «Manual Spray Test» or «Drain Residual Liquid» function (if available) or manually operate the pump.
- Neutralize & Rinse Tank:
- Add soapy water or a suitable cleaning/neutralizing agent to the tank.
- Operate the pump briefly to circulate the cleaning solution through the lines and nozzles.
- Drain the cleaning solution safely.
- Rinse the tank and lines thoroughly with clean water multiple times until all residue and bubbles are gone. Drain completely.
- Clean Exterior:
- Use a damp cloth or low-pressure water spray to clean the drone’s exterior, including the airframe, arms, landing gear, and payload exterior. Pay attention to areas where pesticide residue might accumulate. Avoid high-pressure washing, especially near motors, electronics, and sensors.
- Clean propellers to remove residue.
- Wipe sensor windows (radar, FPV camera) gently with a soft, clean cloth (like a lens cloth).
- Dry: Allow the drone to air dry completely or wipe down with a dry cloth before storage.
- Battery Terminals: Clean battery terminals and drone power connectors gently with a clean cloth or cotton swab, potentially using contact cleaner or alcohol if needed, ensuring they are dry before storage.
Post-Spreading Cleaning:
- Empty Material Tank: Completely empty any remaining granular material from the spreader tank. Use a container if needed for large amounts.
- Clean Spreader Mechanism:
- Clean the inside of the tank, feed roller/gate mechanism, and spinning disc thoroughly to remove dust and residue. Compressed air can be useful here.
- Ensure the mechanism moves freely without obstruction.
- Clean Exterior:
- Wipe down or wash the drone’s exterior as described in the post-spraying steps, removing any dust or granule residue. Pay attention to motors and air vents.
- Dry: Ensure the drone and spreader components are completely dry before storage.
- Battery Terminals: Clean as described above.
General Post-Flight Maintenance Checks (Daily):
- Inspect propellers for any nicks or damage.
- Check arm locking mechanisms.
- Visually inspect wiring for any chafing or damage.
- Check screws for tightness.
- Charge batteries appropriately for storage (refer to battery guidelines, often 50-60%).
Consistent cleaning prevents corrosion, blockages, and ensures your FP700 is ready for the next operation.
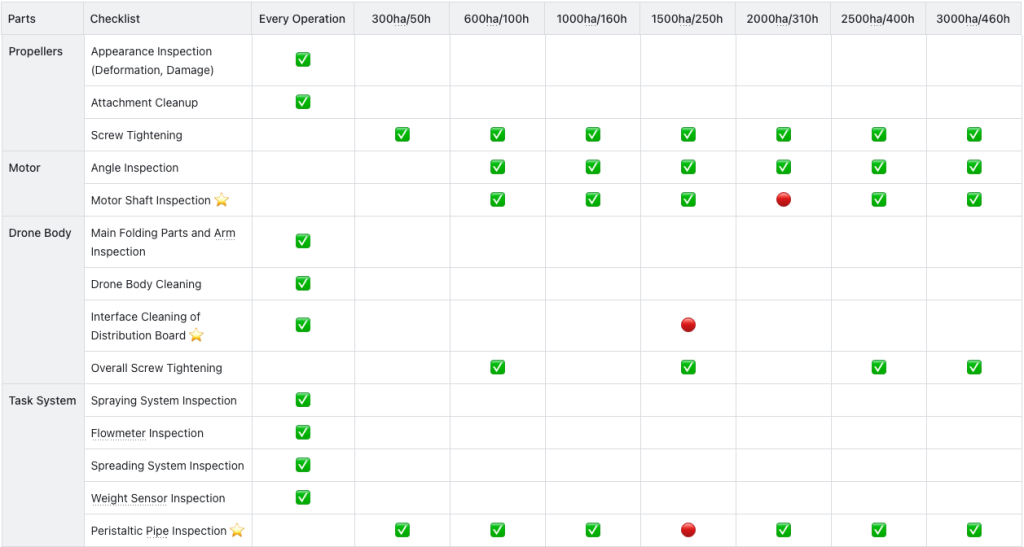
Proper maintenance enhances the service life of the drone. Please review the periodic maintenance checklist below to improve your routine maintenance.
Notes
- If damaged components are found during the maintenance check, they should be promptly replaced.
- Screw tightening inspection includes: Propeller clamp screws, frame bar screws, motor fixing screws, main folding part screws, distribution board screws.
- Spraying/Spreading systems should be cleaned after each operation to extend product lifespan.
- Recalculate the maintenance cycle after drone crash repairing.
- The provided maintenance cycle is a suggested inspection and maintenance interval. The interval may be adjusted based on actual use.
- If any issues arise during daily use, please contact the local dealer promptly for resolution.
- Symbols:
- ✅ : Check
- 🔴 : Replace
- ⭐️ : If operating conditions are challenging, consider shortening the replacement cycle.